Are you searching for the best way to connect a Canon MX492 printer to wifi? Well, you’ve come to the right rescue place. This guide will help you quickly learn a Canon MX492 printer setup on your Windows and Mac computers.
Many brands of printers are available on the market; Canon is the top choice of users regarding perfect prints. Canon is famous for its high-quality printing. If you want to use your Canon printer, the first step is its setup. If a user wants to learn how to connect a Canon MX492 printer to wifi, it can be done quickly by following instructions.
But before you begin the setup process, you will need to confirm the following requirements for your Canon printer to be able to connect to wifi.
- Personal computer or laptop
- Wireless router
- A stable Internet connection
Once you’ve achieved all the essential requirements mentioned above, you can proceed with the wireless setup.
How To Setup A Canon MX492 Printer To Wifi?
If you are using a Windows or laptop, then Canon MX492 wireless setup can be done quickly by following the steps. Before getting started with wireless connection setup, you must prepare your Canon printer for cableless setup. Kindly follow the steps provided below:
Steps To Prepare A Canon MX492 for Cableless Setup
- First, switch on your Canon printer.
- Then, click on the Setup button in the menu option at the top.
- Use the triangle navigation buttons to select the Wireless LAN Setup option and click OK. Select Other Setup and click OK.

- Lastly, select Cableless Setup and click OK.

Now that you’ve successfully prepared your Canon printer for cableless setup follow the steps mentioned to connect it to wifi through your Windows.
How To Connect A Canon MX492 Printer To Wifi On Windows?
To connect a Canon MX492 printer to your wifi, you must have the printer software installed on your Windows.
- First, turn off all your applications before your installation process.
- Next, sign in using an administrator user account.
If you have a computer with a CD-ROM drive enabled, you can insert the CD that came with the Pinter kit. For printer software installation via CD, you have the following:
- Then, insert the CD into the CD-ROM drive.
- After that, press “Run Msetup4.exe” on the AutoPlay screen.
- Now, tap Yes to continue on the User Account Control dialog box.
Alternatively, you can also download your printer installation wizard online. To do this, below are the steps:
- First, visit Canon’s official website at http://canon.com/ijsetup/.
- Next, tap on the Setup option.
- Then, type in your printer model in the search box at the top and tap on the Go button.
- After that, select the country or region on the next page.
- Now, download the Setup.
- Run your download file and start with the installation procedure.
- Follow the steps below to finish the installation procedure.
- Once your file is saved to the PC, double-tap on it and follow your on-screen steps.
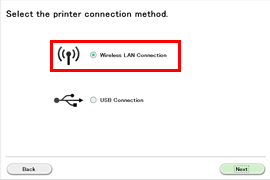
- Then, select the “Wireless LAN Connection” option and tap “Next.”

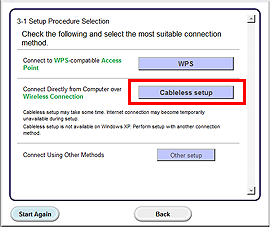
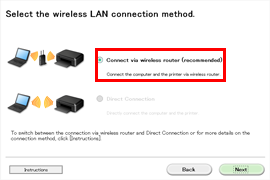
- After that, select the “Connect via Wireless Router” option and tap on “Next.”

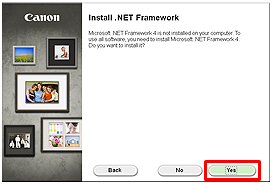
- Tap on the Cableless Setup option. Then, press “Yes.” If you see the “.NET Framework” screen, continue clicking “Yes.”
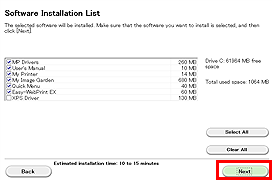
- For the software installation list, tap on the “Next” button.
- Further steps until you notice the Setup Completion dialog box, tap the “Complete” button.
- Tap on “Next,”and if you notice the “Extended Survey Program” on your screen, press “Agree” to participate or press “Disagree“to continue with your installation process without installing the Survey Program. It will not affect the performance of your printer.
- Your installation procedure has been finished so far. Now you will see “Test Print Window” on your screen.
- To check the functionality of your Canon printer, insert a blank paper inside your printer and tap on the “Execute“option.
- Once the test is printed, tap on “Next” and quit the next window.
- Lastly, press “Exit“to complete the installation procedure.
How To Connect A Canon MX492 Printer To Wifi On Mac?
To connect a Canon MX492 printer to wifi on a Mac system, kindly follow the steps given below:
- First, visit Canon’s official site at http://canon.com/ijsetup/.
- Next, tap on the Setup Option.
- Then, select your printer model name by entering “MX492” into the search box and tap on the “Go” button.
- After that, select your country or region and tap on the “Download” option.
- If the file has been downloaded, double-tap your downloaded .dmg file.
- Double-tap the “Setup icon” and click on the “Next” option.
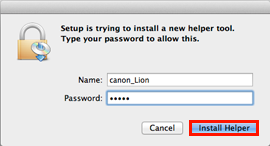
- Afterward, enter the administrator’s name and password in the box screen. Tap on the “Install Helper” option.
- Then, tap the “Next” button.
- Now, choose your printer connection method, select the “Wireless LAN Connection” option, and tap “Next.”
- Next, select your wireless LAN connection method and select the option “Connect via wireless router,” and tap on “Next.”
- Tap on the “Cableless Setup” option and click “Next.”

- Then, tap “Add Printer.”
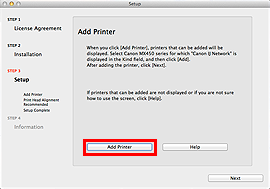
- Select “Canon xxx series Canon IJ Network” and tap on the “Add” button.
- After that, tap on “Next.”
- Now, your setup is done, and tap on “Next.”
- Lastly, tap on the “Exit” button to finish your installation process.
- The Mac system’s Wireless LAN setup using “Cableless Setup” is now complete.
We hope now you know how to connect a Canon MX492 printer to wifi on Windows and Mac. For more guides like this, please visit our blog section.